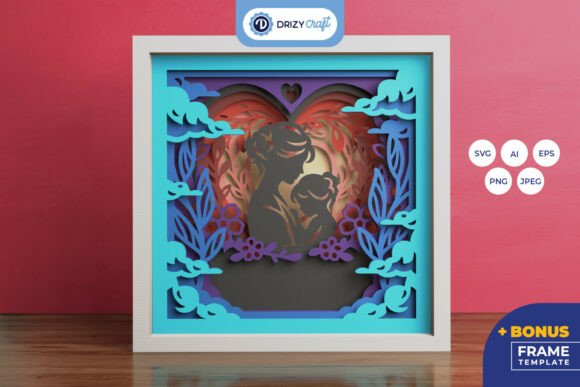
Mastering the Art of Depth: A Complete Guide to 3D Shadow Box Frame Templates
In the world of paper crafting and visual storytelling, flatness is often the enemy of impact. While traditional framing preserves memories in two dimensions, there is a growing desire among hobbyists, educators, and small business owners to add physical depth to their creations. This is where the 3D Frame or Shadow Box Frame Template comes into play. These specialized digital assets are not just simple outlines; they are precision-engineered blueprints designed to create intricate, layered displays that pop off the wall. Whether you are looking to preserve a graduation gown, display a miniature diorama, or simply add a touch of dimensional art to your home decor, understanding how to utilize these templates can transform your creative output.
What Is a 3D Shadow Box Frame?
A shadow box frame differs from a standard picture frame in one crucial way: depth. Standard frames hold photos or posters flush against glass. A shadow box, by contrast, has a deep cavity—often several inches thick—that allows three-dimensional objects to be mounted inside. However, building these frames from scratch requires complex math, precise cutting, and an understanding of structural integrity. This is where digital templates solve the problem.
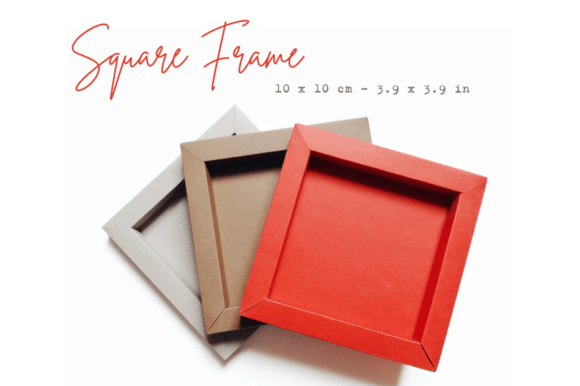
The specific template discussed here is designed for creating cardstock frames with an interior measurement of 10x10 cm. This size is popular because it is compact enough for desk displays yet large enough to showcase meaningful items. The key feature of this template is its thickness: 1.5 cm. This depth is sufficient to accommodate most small memorabilia while maintaining a sleek profile. By using pre-designed files, crafters can skip the trial-and-error phase and move straight to creation, ensuring perfect alignment and consistent results every time.
Understanding the Two Background Options
One of the most sophisticated aspects of this particular template set is the inclusion of two distinct background file types. This distinction addresses the most common challenge in shadow boxing: hiding the seams where the sides meet the back panel. To ensure a professional finish, the download includes both a Standard Background and an Invisible Background.
The Standard Background File
The standard background file is cut to the exact same external dimensions as the frame itself. When you glue the side panels (the 1.5 cm thick walls) onto this background, the background extends slightly beyond the inner edge of the walls. This creates a visible border or "lip" on the inside of the frame. While this might sound like a flaw, it is actually a stylistic choice. It provides a clean, finished look where the background material is intentionally visible, acting as a mat or border around your central object. This is ideal if you want the frame structure itself to be part of the aesthetic.
The Invisible Background File
For those seeking a seamless, gallery-quality finish, the invisible background file is the superior choice. This piece is cut to fit precisely into the interior space left by the side panels. When installed correctly, the background sits flush within the frame’s cavity, completely hidden from view when looking at the frame from the front. Because it is not visible once installed, it eliminates any distracting lines or edges, allowing the viewer’s eye to focus entirely on the 3D object being displayed. This option requires more precise gluing but offers a cleaner, more modern appearance.
File Formats for Every Cutting Machine
The versatility of digital crafting lies in the variety of file formats available. This template pack is comprehensive, supporting nearly every major brand of electronic cutting machine. Understanding which file to use depends on your hardware and software preferences.
- SVG Files (Cricut & Silhouette): Scalable Vector Graphics are the industry standard for digital cutting. For Cricut users, these files are ready to import directly into Design Space. For Silhouette users, there are dedicated SVG files optimized for Silhouette Studio. These files include embedded dotted lines and score lines, which are essential for folding the cardstock cleanly without tearing.
- DXF Files: If you own a Silhouette machine running older software versions that do not support extensions, DXF files serve as a reliable alternative. They contain the same vector data but in a format compatible with a wider range of basic software environments.
- FCM Files: Brother ScanNCut users will appreciate the FCM files. These are native format files that allow for easy importation and editing within Brother’s proprietary software ecosystem.
- PDF Files: Not everyone owns an electronic cutter. For manual crafters, high-resolution PDFs are provided. These are 5-part templates, meaning the design is split into manageable sections for printing and hand-cutting with scissors or craft knives. Note that single-part models are unavailable due to the width constraints of standard printer paper.
Advanced Features: Scoring and Foiling
Professional-looking paper crafts rely heavily on crisp folds. This is why the included files come equipped with score lines. In digital cutting terms, scoring means the machine makes a shallow indent in the material rather than cutting all the way through. This weakens the fibers along the line, allowing for a sharp, clean fold.
Furthermore, if you have access to advanced tools like the Foil Tool or the Foil Function on newer machines, these score lines can be repurposed. Instead of just folding, you can run the foil tool along these lines to create metallic accents or decorative borders. This adds a layer of luxury to your project without requiring additional materials. It is important to remember that when working with stacked elements in the software, you must ungroup or move the layers before sending them to the cutter. Failure to separate the score lines from the cut lines can result in the machine trying to cut through the foil transfer sheet, ruining both the material and the blade.
Getting Started: Tutorial and Support
Navigating digital files can sometimes be daunting for beginners. That is why this package is designed to be self-sufficient. Upon downloading the ZIP file, you gain access to a Tutorial Guide in PDF format. This guide walks you through the entire process, from setting up your software to applying the final glue. Additionally, a link to a video tutorial is included, providing visual confirmation of techniques such as proper scoring pressure and the correct order of assembly.
Common mistakes when starting out include assuming the background is always visible or forgetting to adjust the scale in software. Always double-check your settings. Remember that the "invisible" background only works if the side panels are glued securely over it. If you are new to this, start with the Standard Background option, as it is more forgiving of minor misalignments.
Why Invest in Digital Templates?
In an era where DIY projects are valued for their personal touch, efficiency matters. Creating a 3D frame from scratch involves calculating angles, accounting for kerf (the width of the cut), and testing prototypes. Digital templates eliminate these hurdles. They are tested, refined, and ready to produce professional results immediately. Whether you are a teacher creating educational aids, a scrapbooker preserving life milestones, or an entrepreneur packaging products, these templates offer a scalable solution for adding depth and dimension to your work.
By choosing the right background type and utilizing the correct file format for your machine, you unlock the full potential of 3D framing. The combination of precise engineering and creative freedom makes the 3D Shadow Box Frame Template an indispensable tool for modern crafters.