3D Butterfly Quencher Tumbler Design: A Practical Guide to Flawless Sublimation Results
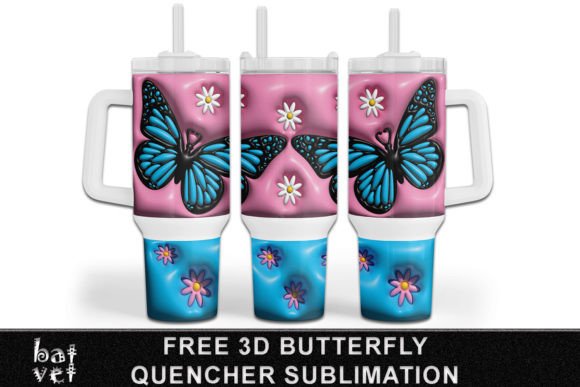
If you are looking to elevate your custom drinkware business or simply want a unique gift for yourself, the 3D Butterfly Quencher Tumbler Design offers a visually stunning solution. This specific design combines the playful aesthetic of pink bubble wrap and delicate flowers with a vibrant butterfly motif, creating a look that is both trendy and timeless. However, the difference between a professional-looking product and a disappointing one often lies in the technical details of how you acquire and apply the sublimation files.
Many creators jump straight into printing without understanding the nuances of two-part sublimation layouts. When you purchase a digital file for a 40 Oz Quencher, you aren't just buying an image; you are buying a precise template that must align perfectly with the curvature of the tumbler. The design in question features a distinct two-part layout: an upper straight section and a lower arched print. Ignoring this structural requirement is the most common pitfall that leads to stretched images, misaligned patterns, and wasted materials.
Understanding the Two-Part Sublimation Layout
The core of this design's success relies on its split architecture. Unlike a single continuous image that wraps around a cylinder, this specific Butterfly, Pink Bubble Wrap, Flowers, Cute Sublimation Wrap is engineered to be printed on two separate pieces of transfer paper. The upper section measures 12.5 x 5.8 inches and remains straight, while the lower section is arched at 10.54 x 3.68 inches to match the tapered bottom of the 40 Oz tumbler.
A frequent mistake occurs when users attempt to stretch a single flat image to cover the entire tumbler surface. Because the Quencher shape changes from a straight cylinder to a curved base, a single image will inevitably distort. The flowers might look squashed, and the butterfly wings could appear unnaturally elongated. By using the provided two-part system, you ensure that the graphics maintain their intended proportions and "3D" depth effect exactly where they need to be.
Why File Resolution Matters
You will receive a zip file containing two high-resolution printable PNG files at 300 dpi. It is crucial to respect this resolution. If you open these files in software that automatically downscales them or if you accidentally resize them before sending them to your printer, the quality will degrade instantly. Low-resolution sublimation prints result in pixelation, blurry text, and muddy colors, which can ruin the presentation of your product. Always check the file properties before printing to ensure the dimensions remain exactly as specified.
Common Pitfalls in Downloading and Preparing Files
The process begins long before you hit the print button. One of the most overlooked steps involves how you handle the downloaded zip file. Users often click the link, see the download start, and immediately close the browser or move on to another task without ensuring the file is fully extracted. If you try to open a PNG directly from within a compressed zip folder, some RIP (Raster Image Processor) software may fail to read the file correctly, leading to missing elements or color shifts.
To avoid this, always unzip the file and save it to a dedicated folder on your computer before opening it in your design software. Furthermore, do not ignore the filename. Many sublimation workflows rely on specific naming conventions or require you to remember exactly where the file is located. If you rename the file randomly or save it to a temporary desktop folder that gets cleared, you may lose track of the high-resolution assets needed for your next order. Make sure you edit the name and location of the file to something logical, such as "Butterfly_Quencher_Upper" and "Butterfly_Quencher_Lower," so you can find them quickly during production.
Alignment Challenges and How to Avoid Them
Even with perfect files, the physical application of the sublimation wrap can go wrong if alignment is not handled carefully. The transition between the upper straight section and the lower arched section is critical. If the seam between these two parts is too far apart or overlaps incorrectly, the bubble wrap pattern will break, and the continuity of the design will be lost.
When applying the heat press tape, measure twice and cut once. Do not rely on guessing the gap between the top and bottom sections. Use a lightbox or a transparency layer in your design software to visualize how the two parts will meet on the actual tumbler before you commit to cutting the paper. A small miscalculation here can result in a visible white gap or a double-layer of ink that looks messy. For best results, practice on a scrap tumbler first to determine the exact spacing required for your specific brand of tumblers.
Evaluating Quality Before You Buy
Before purchasing any sublimation file, whether it is this butterfly design or another, you must evaluate the source. Are the colors vibrant? Does the preview show the full extent of the pink bubble wrap texture? Sometimes, sellers provide low-quality previews that hide potential issues with the vector paths or raster quality. In this case, the promise of a "3D" effect means the design should have depth and dimensionality, not just flat colors.
Check the specifications carefully. Ensure the file size matches your equipment. If your printer cannot handle a width of 12.5 inches, you may need to adjust your workflow or find a different provider. Additionally, verify that the file format is truly a PNG with a transparent background if you plan to layer other elements over it. Using a JPG instead of a PNG can introduce unwanted white borders that are difficult to remove during the wrapping process.
Maximizing Efficiency and Cost
By following the correct procedures—unzipping files properly, maintaining 300 dpi resolution, and respecting the two-part layout—you save money in the long run. Every failed print represents wasted time, electricity, and sublimation paper. More importantly, it protects your reputation. A customer who receives a tumbler with a warped butterfly or a broken pattern is unlikely to return. Conversely, a crisp, perfectly aligned design featuring cute flowers and a charming butterfly will encourage repeat business and positive reviews.
Remember that the goal is not just to print an image but to create a cohesive visual experience. The combination of the 40 Oz Quencher capacity with the whimsical butterfly theme appeals to a wide demographic, from young adults to professionals who appreciate a touch of whimsy in their daily routine. Treat the preparation phase with the same care as the pressing phase, and your results will reflect that attention to detail.
Ultimately, the 3D Butterfly Quencher Tumbler Design is a powerful tool for customization, but only when used correctly. By avoiding the common traps of poor file management and incorrect alignment, you ensure that every tumbler you produce meets the highest standards of quality. Take the time to unzip your files, check your settings, and align your wraps precisely, and you will see the difference in the final product immediately.